Fancy Nail Art Tutorial Using Essie Nail Polish

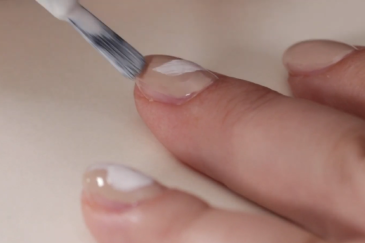
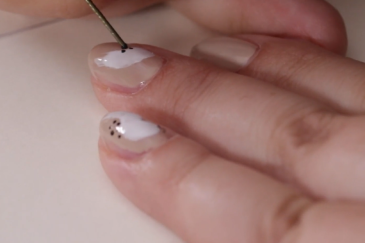
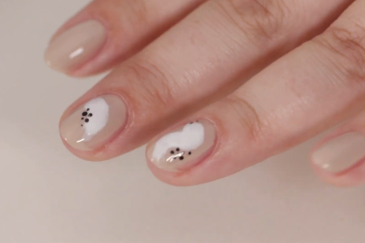
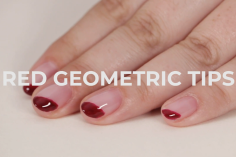
Graduating from your standard nude nail doesn’t have to be difficult with this straightforward nail design tutorial, which looks much more complicated than it is. 

In this routine, Chelsea Bagan from Trophy Wife Nail Art demonstrates how to achieve these intricate nail art designs with minimal effort using Essie nail polishes. 

Shop the Look:

Ace these nail designs at home with just 3 polishes, a top coat, a palette and a bobby pin! 

Fancy Nail Art Tips:

  • Try using a bobby pin with a flat tip for detailing with more precision.

  • It’s always good to use a base coat because it prevents your nails from staining and helps them last a lot longer.

  • The best bit about this look is that it doesn’t have to be precise and you can repeat this pattern on all of your nails or just leave it a signature piece on just a few. 

Our fabulous & fancy nails routine:

Step 1: Base coat

Step 1: Base coat

Start with a layer of your base coat using essie nail care - all in one . This product has a thin consistency and can also be used as a top coat.

Step 2: Nude Base

Step 2: Nude Base

Next, apply two coats of essie nail colour - sand tropez starting at the base and back brushing until you reach the tip. Then let the polish dry down.

Step 3: Abstract Shapes

Step 3: Abstract Shapes

To start creating your abstract shapes take the Essie Nail Polish - Blanc and wipe the excess polish off the brush before you begin. Then, using a really light touch, make abstract swirls on the centre of your nail. You can go over it again in pieces if you feel like you need a bit of extra coverage. 

Step 4: Detailing

Step 4: Detailing

Take a small amount of the Essie Nail Colour in Licorice onto your palette. Then, pull your hair pin apart and dip the flat edge into the black polish. Practice creating some nice, fine dots on your palette and then add this detail to your nails. Dot these on the edge of the shape you’ve created.

Step 5: Gel top coat

Step 5: Gel top coat

The final step in this routine is applying a layer of the Essie Nail Care Gel Setter Top Coat.Don’t press too hard, simply float the polish across the nail and then let this layer dry. 

The Final Look: Chic & unique nail design 

The Final Look: Chic & unique nail design 

We hope you enjoyed these fancy nail designs and want to try them at home! The best part of this look is how easy it is to replicate and how much room there is for variation. Be creative, and go with colours that you love or even try something new.

How do I shape my nails at home?

If you can’t get to a nail salon, or just prefer an at home manicure then shaping your nails first is an important step. 

First, choose your nail shape: round, square, squoval (a mix between square and oval), almond or stiletto. To choose the right shape for you try matching it to the shape of your cuticle.

Take your nail scissors or clippers and cut them into shape (leaving them a bit longer than desired). Then, take your nail file or emery board and file your nail down, shaping them as you file.


Ombre Nail Polish Tutorial Using Essie Nail Polish

How to take your nail routine to the next level with this easy ombre nail tutorial for short nails...

Geometric Nail Art Tutorial Using Essie Nail Polish

Shake up your nail game with this stylish negative space look using red nail polish to create striking nail art...

What's the Best Way to Remove Stubborn Nail Polish?

How to remove nail polish without wrecking your nails...

    DISCOVER MORE ROUTINES LIKE THIS

    Subscribe for beauty sales, free goodies, advice and SO much more!